 |
|||||||
|
|
|||||||
Garamsythe Waterway
Once back into Rabanastre go to Old Dalan's where he gives you the Crescent Stone. Now head to North Sprawl to Storehouse 5. Speak with Kytes and he opens the left waterway door for you. He also hands over 2 Potions and 4 Eye Drops. If you don't have very many Eye Drops it would be a good idea to pick some up before going through the door.
Once inside the door you'll be on a pretty straightforward path through the waterway. Don't be fooled by the maze-like appearance of the waterway - there's only one place to go. You will eventually find stairs up the the Palace Cellar.
The Palace
Warning: Upon entering the cellar there two chests to the right. DO NOT TOUCH the boxes. These chests are the second set to leave be in order to get the ultimate weapon. For more information on them please check out our Zodiac Spear sidequest page.
The other boxes in this area are fair game. When you get to the far north of this room you will trigger a scene. Try to go up the stairs and then speak with the Seeq. Follow the Seeq's plan by passing to the right of the guard and around to go up the stairs.
Now that you're upstairs comes the puzzle. What you have to do is move groups of guards (A,B,C,etc.) out of your way to get to the Lion Signet, rather than the Hawk Signet.
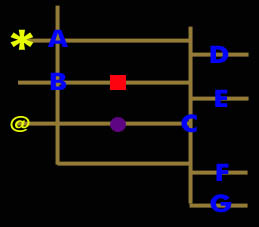
Step One is to move Guard Group C. Taunt the guard down the hallway you're facing when you entered (marked by the @ symbol on the map) and run south down the path and then to the right to loose the guard. The guard will now be positioned at the intersection directly in front of where you started.
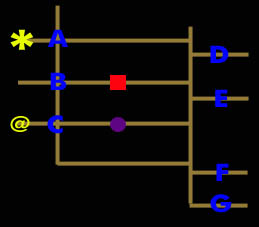
Step Two is to make your way to the Lion Signet and use the Crescent Stone on it. Step Three: With that accomplished it's time to pave the path to the Exit (marked by the Star on the map). Starting with group A and down on to group C taunt them all over to the right vertical hallway on the map. The goal is to get them positioned like this:
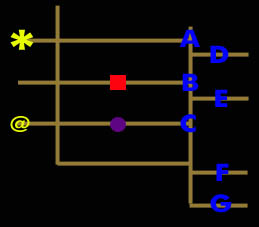
Step Four is to make your way to the Exit in the top left corner of the map. The grate at the end of the hallway should have a faint light - talk to it to open the door.
In this room all there is to do is examine the wall to the left and push the switch to unlock the "Suspicious" wall on the opposite side of the room. Examine it to open the door and end up in the treasury. This triggers an exciting cut-scene in which Vaan obtains the Goddess's Magicite. After that Vaan ends up at the foot of some outdoor stairs. Climb them to continue the previous scene in beautiful cinematics. After the cinematics you'll find yourself partied with the dashing sky pirate and the exotic viera.
Garamsythe Waterway
First thing's first - now that Vaan has a bigger party Balthier's going to teach you Gambits. There's not much you can do at this point but set up a basic attack and cure setup. The best strategy is to always put cure gambits above attack in the sequence. For more information check out our Gambits Section
With that taken care of it's time to get out of the sewers. This time you're in East Waterway instead of West Waterway. And again it's fairly linear. Make sure to pick up boxes in the alcoves while making your way towards East Sluice Control. On the way grab the map urn in East Waterway Control. Also, if you're having trouble with the Gigantoads it's good to note they're weak to fire.
At East Sluice Control you come upon a save point and it's best to use it now. When you head down the stairs you come upon a battle between Imperials and Rebels. Vaan saves a woman rebel and the party then finishes off the Imperials. The woman, Amalia, joins your party as a guest - she fights with you but doesn't take commands from you. You may save again if you wish. After that press westward to the Southern Sluiceway.
Here you must fight 4 Flans that are weak to fire. Switch everyone to attack with Fire if possible and if you have a Red Fang you can hit all four with one fire attack. After that it's time to head to the West Sluice Control and then go north from there. Then go through the No. 10 Channel to get to the Central Waterway Control where you'll find some rusted machinery and a save point. Save your game and then go through the door to the Overflow Cloaca.

Firemane
| Level: 7 | LP:3 |
| HP: 3571 | MP: 720 |
| Vulnerable: W | Immune/Absorb: F |
| 1/2 Dmg: N/A | |
| Drop: N/A | Steal: Potion, PHoenix Down, Grimoire Togain |
This is the first, officially real boss of the game. First thing's first - make sure no one is still set to attack with fire. After that the only attacks you have that can hurt the fire spirit are regular attacks. Make sure to keep everyone healthy - including Amalia. She auto phoenix downs any KO'd character so she's a worthwhile investment. If Firemane uses its Brushfire attack make sure to Antidote any posioned characters. With all that said keep your characters healthy and attack the boss until it's finished.
After all that it's a very empty victory because the party immediately gets scooped up by Imperial soldiers and shipped off to Nalbina Prison.
Return to topReturn to FFXII Main Page Return to FFExodus Main Page
| Game titles, images and content belong to SquareEnix, we lay no claim to them. Custom content and graphics, however, are © FFExodus team. |