 |
|||||||
|
|
|||||||
Tetra Master
Player Ranking | Finding Rare Cards
Introduction
Tetra Master is a card game played by a large portion of Final Fantasy 9 NPCs. To find someone who plays you simply walk up to them and press square. If that person plays Tetra Master a card game will begin. If they dont then they will respond the same as if you had pressed X to talk to them normally. To play you must have at least five cards in your inventory. You can have a maximum of 100 cards in your inventory. Cards can be found hidden in towns, dropped after random encounters, given to you by characters, won in card games, obtained in sidequests, and even occasionally bought. The game is not entirely optional as you will have to win at least two card games to progress through story. What you do beyond that is totally up to you. As you play and collect cards you gain rank with the ultimate goal of becoming a Master.
And what do you get for obtaining that Master status? Unfortunately, nothing but bragging rights. You will not receive any rewards such as gil, hidden content, items, or even a pat on the back. But dont let that stop you! Tetra Master can be fun in and of itself. Plus you cant really say youve mastered the game until you see that perfect collection in your card inventory.
How to Play
Tetra Master is played on a four by four grid. Of the sixteen card spaces up to six of them may be blocked out, preventing you from placing a card in that position. Basically what you do is take turns putting cards into one of the spaces. Your cards are tinted blue and your opponents cards are tinted orange. The objective is to take your opponents cards and make them blue by flipping them over. This is done either by flipping a card on an unprotected edge or winning a card battle. The game ends once both players have placed all five of their cards. When you win you can pick one of an opponent's cards to keep but only if it was under your control by the end of the game. If you managed to capture all the cards on the board you score a Perfect. In this case you'll get to keep all your opponent's cards.
The Anatomy of a Card:
On every card you will find two things besides the image of the card a sequence of four letters and/or numbers and an arrangement of arrows (see explanation of cards with no arrows below).
StatisticsThe first step to understanding how a card works is to know what those letters and numbers mean. These are the cards stats. The first character is the cards Power. The second is the cards Type (well cover type in just a bit). Third is the cards Physical Defense. And finally we have the cards Magical Defense.
Power and Defense stats are written in whats called hexadecimal format. There are fifteen different strengths possible the first eight are represented by the numbers 1 9. 10 15 are represented by the letters A F. They did this to keep the statistics down to just four characters. Well discuss how these statistics play in a card battle later.
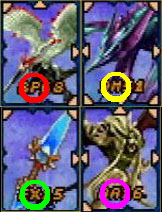
That second character, the cards Type, can be one of four types. "P" stands for a physical attack. A P cards power stat will attack an opponents physical defense. "M" stands for a magical attack and attacks a cards magical defense.
The other possibilities are an X or an A. An "X" card will use its power stat to attack an opposing cards lowest defense stat. An "A" card takes things one step further and will use its power stat to attack the other cards lowest number even if that number is the cards attack power stat. To learn more about card type jump down to the instructions for card battles.
ArrowsEach card will have an arrangement of 0 8 arrows possible at the top, bottom, left, right, and four corners. These arrows, depending on how a card is placed, determine whether a card will flip an opponents card or initiate a card battle.
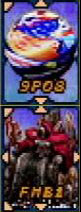
In this image we see that the card on the left has an arrow pointing to the card directly to the right of it. The card on the right doesnt have an arrow pointing back. In this situation the left card will perform an unprotected flip on the right card and it will become yours.
Here you will see that both the top card and the bottom card have arrows pointing at each other. In this situation there will be a card battle to determine which card flips the other one. The next section will explain how card battles work and how arrows work to your advantage or disadvantage.
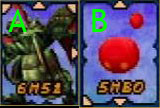
Arrows only go into effect when they are placed. For instance, in the above situation card A was placed first. When card B is placed next to A it wont flip even though card A has an arrow pointing to it. However, if card A were placed second it would flip card B.
Note: Very rarely you will come across a card with no arrows. They cannot participate in card battles because they are completely unprotected against being flipped. However, they are not entirely useless. If you decide to play with a card without arrows they wont end up triggering combos that lose you a lot of cards. They can also be safely played as a last card.
Card Battles
The biggest downside to Tetra Master (besides the lack of rewards) is its randomness. There are a lot of variable factors that prevent most battles from ever being a sure thing. Because of ranges and computer generated dice throws a weaker card can sometimes overtake a card you might have thought was strong enough to be safe. This can be to your advantage if youre playing against someone with a lot of strong cards. It also gives you chances to flip rare cards with high stats. Unfortunately, these same principles work just as well for your opponents. Dont let this discourage you though. This guide will arm you with details that might just make the randomness seem a little less . . . random.
It's All In the Numbers
When a cards stats are pitted against another card it will randomly fall within a range of fifteen possible Actual Values. So, for instance, a 0 card can be as weak as 0 or as strong as 15. Thus, the stats possible ranges break down like this:
| 0 | = | 0-15 |
| 1 | = | 16-31 |
| 2 | = | 32-47 |
| 3 | = | 48-63 |
| 4 | = | 64-79 |
| 5 | = | 80-95 |
| 6 | = | 96-111 |
| 7 | = | 112-127 |
| 8 | = | 128-143 |
| A | = | 144-159 |
| B | = | 160-175 |
| C | = | 192-207 |
| D | = | 208-223 |
| E | = | 224-239 |
| F | = | 240-255 |
When a card battle initiates there are several steps, each with their own computer generated dice roll.
Step One: The computer rolls to determine where each card stat falls in its range of fifteen possible Actual Values.
Step Two: Next the computer rolls for a number between 0 and the Actual Value as determined in step one.
Step Three: Now the computer takes the roll from step two and subtracts it from the Actual Value. Whichever card ends up with the highest number after this process wins.
So, heres an example:
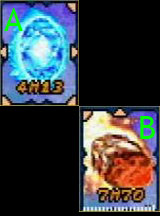
Step One: Card As stats read 4M13. The dice rolls are made for the cards power and 4 becomes an Actual Value of 69.
The same process happens for card B (7M70). Its Actual Value ends up as follows: its magic defense of 0 becomes 13.
Step Two: In this step card A rolls a 59. Card B rolls a 1.
Step Three: For card A 69 59 = 10. For card B 13 1 = 12. Thus card B defeats card A even though it had a magic defense of 0 going up against an attack stat of 4. (And Flare takes out Holy BOOM!)
As you can see, because of the random factor the results of a battle are quite unpredictable. Still, your best tactic when picking cards to play with in regards to stats is the higher the better.
Now, here are some examples of what happens when X and A cards are played.
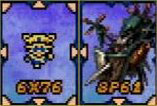
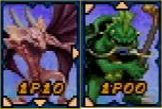
For this situation the left card has the stats of 6X76. The card on the right is 8P61. When the left card initiates a battle with the right card its attack of 6 will target the second cards lowest defense number in this case 1. The battle then goes through the sequences we described above.
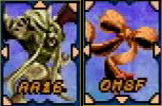
In this battle the attacking card has the stats AA16. The defending card has the stats 0M8F. If the first card were an X card the second card would have a high chance of surviving because of its high defense stats. However, the attacking card is an A card which means that it will be attacking the defending cards lowest stat. In this case that stat is a 0. It will have to try to stand up to a card with a power of A (10). When A cards get thrown into the mix you have to watch out because even if you think your cards are well protected they can still get taken down by your opponent sneaking in an A card.
Now, you might be wondering how you get these fabulous "X" and "A" cards. It is possible to acquire them through playing the game or during sidequests. However, you can also "level up" your cards first to an "X" and then to an "A" by constantly playing the card you want to level up. It takes some work but it can be done. And it's something you have to do for all 100 of your cards to obtain a Master rank (see Player Ranking for more info).
Combos
In addition to understanding the mathematics of the game you also need to know how to use those arrows to tweak things in your favor. Up until now weve only pitted cards against each other one-on-one. In reality there are going to be lots of cards on the board and you need to possess the majority of them before both parties have placed all five of their cards. Not only do you have to know how to perform combos, but you also have to be careful not to let your cards get set up to fall into an opponents combo.
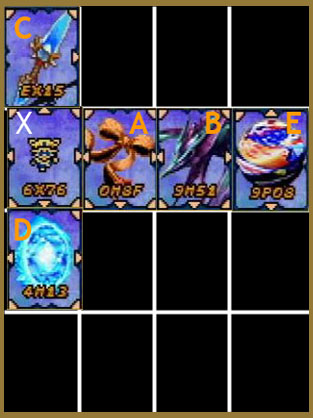
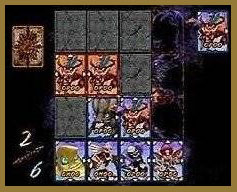
Here we see a possible arrangement of cards on the grid. In this situation well say that youve been having a very bad game so far all the cards with orange letters are held by your opponent. To turn things around you place card X and heres what happens:
Card X automatically flips cards C and D because they are unprotected. Now lets say that card X battles card A and wins so card A is flipped. Because of that card B is also flipped. This is where things get a little confusing. When you flip a card immediately adjacent to the card you place any card next to the flipped card is also flipped if there is an arrow facing it. This happens even if the third card (card B in this example) has an arrow pointing back. It is flipped and there is no second card battle. Finally we have card E. A combo can only extend out to two cards. Even though cards A and B flip, your opponent will keep control of card E because its beyond the reach of the combo.
These are the basics of using combos. It will take time for you to come up with strategies that work best for you but with an understanding of how the stats and combos work you have the information you need to get started. Good luck and have fun!
Player Rank aka Collector Level
The ranking system for Tetra Master isn't based on how often you win but rather on your collection of cards. This is why they call it your Collector Level. Each card in your collection is worth a certain amount of points depending on its stats and arrow arrangements.
To get the maximum number of points for a card it has to 1) be an "A" level card and 2) have an arrow combination that doesn't match any other card in your collection. There are 100 cards to collect and you can only have 100 cards in your inventory so things can get really tricky close to the end there.
Here are the point values for cards:
| Card with unique arrow arrangement | 15 points |
| Card without unique arrow arrangement | 10 points |
| Duplicate card with unique arrows | 5 points |
| Duplicate card without unique arrows | 0 points |
An "X" card will have one extra point added to its total and an "A" card will get two extra points. This point system gives you a maximum total per card of 17. To get a Master rank you need 1698-1700 points. This means that you can only have one card that isn't an "A".
When you look at your card inventory it will tell you what your current rank is. In case you're wondering where you're at on the path to becoming a Master here's the breakdown:
| Your Level | Points |
| Beginner | 0-299 |
| Novice | 300-399 |
| Player | 400-499 |
| Senior | 500-599 |
| Fan | 600-699 |
| Leader | 700-799 |
| Coach | 800-899 |
| Advisor | 900-999 |
| Director | 1000-1099 |
| Dealer | 1100-1199 |
| Trader | 1200-1249 |
| Commander | 1250-1299 |
| Doctor | 1300-1319 |
| Professor | 1320-1329 |
| Veteran | 1330-1339 |
| Freak | 1340-1349 |
| Champion | 1350-1359 |
| Analyst | 1360-1369 |
| General | 1370-1379 |
| Expert | 1380-1389 |
| Shark | 1390-1399 |
| Specialist | 1400-1449 |
| Elder | 1450-1474 |
| Dominator | 1475-1499 |
| Maestro | 1500-1549 |
| King | 1550-1599 |
| Wizard | 1600-1649 |
| Authority | 1650-1679 |
| Emperor | 1680-1689 |
| Pro | 1690-1697 |
| Master | 1698-1700 |
The Cards
Like we've mentioned, there are 100 cards in the game to collect. They can be found dropped by monsters and hidden around the world (on the map and in sidequests) or you can win them in card battles. Some of them can only be won by besting some of the world's most legendary players. Some of these players are found in the Teno Card Stadium. There are also four Phantom Card Masters hidden in Memoria in disc 4.
There's one trick we should mention at this point. When you're going around collecting cards the stats and arrow configuration of hidden cards are not predetermined. This means you can save before opening that chest and if you don't get a card arrangement that you like you can reset and try again. This can only be done for the cards you find - cards won in card battles keep the stats they had when your opponent played them.
In the table below we've listed all the cards in the columns and order they will appear in your card inventory:
| Column 1 | Column 2 | Column 3 | Column 4 | Column 5 |
| Goblin | Yeti | Carrion Worm | Blazer Beetle | Ash |
| Fang | Mimic | Cerberus | Abomination | Wraith |
| Skeleton | Wyerd | Antlion | Zemzelett | Gargoyle |
| Flan | Mandragora | Cactuar | Stroper | Vepal |
| Zaghnol | Crawler | Gimme Cat | Tantarian | Grimlock |
| Lizardman | Sand Scorpion | Ragtimer | Grand Dragon | Tonberry |
| Zombie | Nymph | Hedgehog Pie | Feather Circle | Veteran |
| Bomb | Sand Golem | Ralvuimahgo | Hecteyes | Garuda |
| Ironite | Zuu | Ochu | Ogre | Malboro |
| Sahagin | Dragonfly | Troll | Armstrong | Mover |
| Column 6 | Column 7 | Column 8 | Column 9 | Column 10 |
| Abadon | Ifrit | Excalibur II | Blue Narciss | Mog |
| Behemoth | Ramuh | Ultima Weapon | Hilda Garde 3 | Frog |
| Iron Man | Atomos | Masamune | Invincible | Oglop |
| Nova Dragon | Odin | Elixir | Cargo Ship | Alexandria |
| Ozma | Leviathan | Dark Matter | Hilda Garde 1 | Lindblum |
| Hades | Bahamut | Ribbon | Red Rose | Two Moons |
| Holy | Ark | Tiger Racket | Theater Ship | Gargant |
| Meteor | Fenrir | Save the Queen | Viltgance | Namingway |
| Flare | Madeen | Genji | Chocobo | Boco |
| Shiva | Alexander | Mythril Sword | Fat Chocobo | Airhsip |
Finding Rare Cards
Which cards are rare, you ask? Well, we consider it this way. Cards in the first five columns are not rare. In almost every situation these cards are dropped by either the monster on the card or the monsters found in the same area. Most of the cards in the last five columns are harder to find and sometimes take very specific actions to obtain.
For the purposes of this section we won't be giving the specifics of how to find cards that are not rare. If you are having trouble finding one of the tougher monsters try playing Best Master Gilbert in the Treno Card Stadium.
Now, on to where you can find those rare cards:
-Abadon: Win it from Beast Master Gilbert at the Stadium.
-Behemoth: Win it from Beast Master Gilbert at the Stadium.
-Iron Man: Race Hippaul to level 60 in Alexandria (pre-destruction while controlling Vivi) OR play Beast Master Gilbert OR play Master Phantom OR sometimes dropped by Nova Dragon.
-Ozma: Defeat Ozma - dropped by Ozma or acquired from Mene after defeating Ozma OR win from Beast Master Gilbert OR win from Dark Phantom.
-Hades: Win from Master Phantom OR win from Rare Phantom.
-Holy: Win from Magic Master Thalisa in Treno Card Stadium OR win from Strong Phantom.
-Meteor: Get from Sales Clerk in Daguerreo OR win from Magic Master Thalisa OR win from Strong Phantom.
-Flare: Win from Magic Master Thalisa.
-Shiva: While controlling Vivi in Alexandria ring the bell in the Steeple OR win from Eidolon Master Leyra at the Treno Card Stadium.
-Ifrit: While controlling Vivi in Alexandria ring the bell in the Steeple OR win from Eidolon Master Leyra.
-Ramuh: While Controlling Vivi in Alexandria ring the bell in the Steeple OR win from Eidolon Master Leyra.
-Atomos: Win from Sky Chocobo in Chocobo Paradise OR win from Eidolon Master Leyra OR win from Strong Phantom.
-Odin: Found in Chocograph 24 - Forgotton Island OR win from Eidolon Master Leyra.
-Fenrir: Win from Eidolon Master Leyra.
-Madeen: Win from Eidolon Master Leyra OR win from Strong Phantom.
-Alexander: Chocograph 17 - Sea at Dusk OR win from Weapon Master Hunt OR win from Strong Phantom OR win from Rare Phantom.
-Elixir: Found in chest at South Gate (disc 3) OR Win from Weapon Master Hunt OR win from Rare Phantom OR win from Strong Phantom.
-Dark Matter: Race Hippaul to level 50 in Alexandria (pre- destruction while controlling Vivi) OR Win from Rare Phantom OR win from Defense Phantom.
-Tiger Racket: In Jump Rope Mini-Game skip rope 300 consecutive times (as Vivi or Dagger) OR win from Rare Phantom.
-Save the Queen: Win from Weapon Master Hunt.
-Genji: In Jump Rope Mini-Game skip rope 100 consecutive times (as Vivi or Dagger) OR Race Hippaul to level 70 (pre destruction while controlling Vivi) OR win from Rare Phantom OR win from Strong Phantom.
-Mythril Sword: Dropped by Gizamaluke or Alexandrian Soldier OR win from Weapon Master Hunt.
-Blue Narciss: Found in Chocobo Treasure Trove 4 OR win from Four-Armed Man in Daguerreo.
-Hilda Garde 3: Chocobo Treasure Trove 8 OR win from Four-Armed Man OR win from Master Phantom.
-Cargo Ship: Chocobo Treasure Trove 2 OR win from Four-Armed Man.
-Red Rose: Found in Chocobo Treasure Trove 5 OR win from Four-Armed Man.
-Theater Ship: Have Vivi win the Festival of the Hunt OR win from Four-Armed Man.
-Viltgance: Buy from Mene for 1800 Chocobo Hot and Cold points OR win from Four-Armed Man.
-Chocobo: Win from Fat Chocobo in Chocobo Paradise.
-Fat Chocobo: Win from Fat Chocobo OR given to you by Fat Chocobo for completing Chocobo Hot and Cold.
-Mog: Win from Rare Phantom.
-Frog: Win from Sky Chocobo in Chocobo Paradise OR win from Rare Phantom.
-Oglop: Win from Sailor Erin during third round of Treno Card Tournament OR win from Oglop master Bon in Treno Card Stadium.
-Alexandria: In Jump Rope Mini-Game skip rope 200 consecutive times (as Vivi or Dagger) OR talk to the Girl in Alexandria square (disc 3 or 4) OR win from Strong Phantom.
-Lindblum: Found in ruins to left of Card Freak Gon's house in Lindblum (disc 2-4) OR win from Strong Phantom.
-Twin Moons: Win from Strong Phantom OR win from Rare Phantom.
-Gargant: Dropped by defeated Ralvuimago in Gargan Roo OR win from Genome in Black Mage Village (disc 4).
-Namingway: Hidden in Kuja's sanctuary in Desert Palace (disc 3) OR win from Mario during 2nd round of Treno Card Tournament.
-Bobo: Win from Fat Chocobo in Chocobo Paradise OR win from Rare Phantom.
-Airship: Found in Chocobo Treasure Trove 1 OR win from Rare Phantom.
Return to top
Return to FF9 Main Page Return to FFExodus Main Page
|
|
|||
|
Abilities
Armor & Add-ons Bestiary Characters Eidolons Items Side Quests Synthesis Walkthrough Weapons |
|||
|
|
|||
|
|
Extra stuff Extra stuff Extra stuff Extra stuff Extra stuff Extra stuff Extra stuff |
||
| Game titles, images and content belong to SquareEnix, we lay no claim to them. Custom content and graphics, however, are © FFExodus team. |