 |
|||||||
|
|
|||||||

Academia - 400AF
This version of Academia is arguably the most tedious (even annoying) location of the game. In this location the Mog Clock works differently. When it goes off it starts a countdown during which you have to strike an enemy wandering in the area to gain a preemptive strike. Otherwise you will be forced into a locked battle. There is no way to avoid a battle and the clock can trigger even if you're standing still. What makes this worse is that the location is almost a labyrinth and is easy to get lost in. In the early stages of the location you will primarily fight the extremely weak Ghoul (with a pathetic 2 CP per battle and a miniscule amount of Gil) but the encounters are very frequent. Once you get past the Alley area you'll start fighting more difficult Cie'th with just as much frequency. It is in your best interests to take the quickest route possible if you've got a weaker party, ignoring treasure spheres that are off the main path. There are spheres and a few side items to collect here but it will be much easier to do so at a later date.
That said, here's what you need to do to get through the location.
Treasure Spheres
- Casino Ticket x3
- Power Orb x8
- Guardian Amulet
- Watchman's Amulet
- Mark of the L'Cie
- Elixir (Advanced Moogle Hunt)
- Auric Amulet
- Kaiser Knuckles
- Power Engine x8
- Phoenix Down
- 1050 Gil
- Phoenix Blood (Moogle Hunt)
- 2000 Gil
Treasure Boxes
- Map of Academia
- 'Farewells' Gate Seal
- Graviton Core Delta (Moogle Hunt)
- Tower Artifact
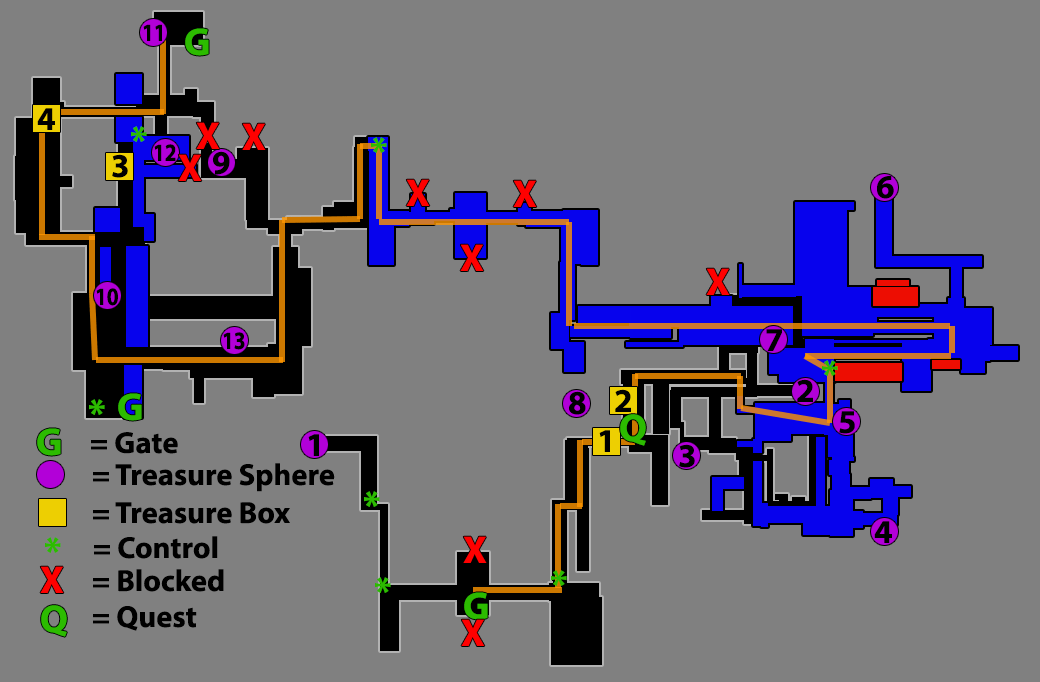
The orange line in the above map (click for larger view) shows the most direct route you can take through this area. Ramps go up and down throughout the map - the blue color shows where the path drops down. Along this main path you should always have a control with which to change the directions of the ramps. However, if you find yourself without one you can simply jump repeatedly in the direction you want to go and you'll slowly make it past the ramp.
As you follow the path right and then up you'll run into Chocolina and a woman named Miss Horizon. Speaking to her starts the Academic Rank: Paradox Professor quest. To complete this quest you must return to her after gaining 100% exploration of the different locations. For more tips on that see the Fragments section below the main walkthrough. Chocolina also has some new equipment - notably new weapons for Serah and Noel. Also, grab the 'Farewells' Gate Seal in the treasure box.
When you're ready confront the Koboldroid Yin guarding the barrier. Follow the map directions east, south, and then into the larger open area. Here you will face a Fencer. It can be defeated with a solid bout of Relentless Assault, but if you get into trouble Delta Attack is always a good option.
Once the barrier is down head north up the stairs. You'll get a cutscene and then a fight with a Ghoul and a new enemy - the Taxim. The Taxim will now be a frequently encountered enemy as you proceed. They aren't terribly troubling but watch out for the Wound damage it inflicts. It could be a problem for under developed parties.
Follow the path west until you hit another cutscene. You'll be introduced to the Nelapsi, a flyer that comes in packs, usually accompanied by a Taxim. If they appear with a Taxim make sure to take out the Nelapsi first. Keep pressing west across the center path.
Use the control where the path turns north. Keep following the path down and around. After you fight past the Fencer blocking your way you'll start a chain of battles and cutscenes, including the final boss for the location. Prep yourself and move forward.
After the first cutscene you'll fight a Nelapsi paired with a Cocytus. Make sure to take out the Nelapsi before tackling the Cocytus - which has a higher HP than the Cie'th you've fought thus far. Following that you'll have a cutscene followed by a solo fight with a Cocytus.
After the next cutscene you'll confront Zenobia, a rather nasty opponent.
Boss: Zenobia
Zenobia starts in Defensive Stance which makes her impervious to damage. You'll have to eliminate the tentacles before you can hit her. Once they're down drive up the chain gauge with Relentless Assault. Once you stagger her hit her as hard as you can but pay attention to the stagger bar. Once it's almost out you'll need to switch to a defensive paradigm such as Tortoise. You'll get hit with the nasty Onslaught attack. After that the tentacles return, which hit harder than before. If you're struggling use Delta Attack, but stronger parties might be able to stick with Relentless Assault. Once the tentacles are gone stagger Zenobia again. She should fall before the next stagger ends.
Following the fight you'll get a cinematic action sequence. The key combinations are L-Up, L-Left + Circle/B, L-Right + Circle/B, L-Right, and X/A hit repeatedly.Your rewards for the fight are 6000 CP, the Tower Artefact, and the Zenobia Fragment. Use the gate to the north to unlock Augusta Tower 200AF. However, rather than going straight there you'll need to take a detour to Augusta Tower 300AF. It is accessed by using the Wild Artefact gate in Yaschas Massif 01XAF in the west part of the Pass of Padra. Refer to the Wild Artefact Locations page if you don't already have a Wild Artefact on hand.
Return to topReturn to FF13-2 Main Page Return to FFExodus Main Page
| Game titles, images and content belong to SquareEnix, we lay no claim to them. Custom content and graphics, however, are © FFExodus team. |